Lief vor ein paar Minuten auf ProSieben :D
Mittwoch, 22. Juni 2011
Dienstag, 31. Mai 2011
How to play Minecraft with a Wiimote
How to set up Bluetooth correctly
Edit the file /etc/cwiid/wminput/minecraft eg. with
sudo gedit /etc/cwiid/wminput/minecraft and copy and paste the code below. You could also save this file as /etc/cwiid/wminput/minecraft Now start wminput:
sudo wminput -c minecraft -w Pointing does not work but I'm figuring it out ;)
I think the key assignment is self-explanatory.
#Head Movement
Plugin.acc.X = REL_X
Plugin.acc.Y = REL_Y
#Body Movement
Plugin.nunchuk_stick2btn.Up = KEY_W
Plugin.nunchuk_stick2btn.Down = KEY_S
Plugin.nunchuk_stick2btn.Left = KEY_A
Plugin.nunchuk_stick2btn.Right = KEY_D
#Left Mouse Button, Right Mouse Button and Space
Wiimote.B = BTN_LEFT
Nunchuk.Z = BTN_RIGHT
Wiimote.A = KEY_SPACE
Wiimote.Home = KEY_E
Wiimote.2 = KEY_ESC
[Tutorial] Minecraft mit Wiimote und Nunchuk spielen
Falls Bluetooth noch nicht läuft
Hier habe ich eine Anleitung geschrieben um Bluetooth zum laufen zu bekommen.
sudo apt-get install bluez-utils libopenobex1 wmgui wminputsudo /etc/init.d/bluetooth restartsudo modprobe uinputsudo su echo "uinput" >> /etc/modules
Bearbeite die Datei /etc/cwiid/wminput/minecraft z.B. mit
sudo gedit /etc/cwiid/wminput/minecraft und füge den Code von unten ein. Du kannst auch diese Datei als /etc/cwiid/wminput/minecraft speichern.Dann wminput per
sudo wminput -c minecraft -w starten.Die Maus wird dann durch Kippen des Wiimote gesteuern, WASD liegt auf dem Stick den Nunchuk. Die B-Taste ist die Linke Mausstaste, Z (Nunchuk) die Rechte, mit A hüpft man (Leertaste), mit der Home-Taste öffnet man das Inventar (E) und mit Taste 2 drückt man Escape. Ich bin gerade dabei, eine Config zu machen, mit der man Minecraft mit dem Infrarotsensor, also wirklich durch zielen auf den Bildschirm und nicht nur durch kippen
#Head Movement
Plugin.acc.X = REL_X
Plugin.acc.Y = REL_Y
#Body Movement
Plugin.nunchuk_stick2btn.Up = KEY_W
Plugin.nunchuk_stick2btn.Down = KEY_S
Plugin.nunchuk_stick2btn.Left = KEY_A
Plugin.nunchuk_stick2btn.Right = KEY_D
#Left Mouse Button, Right Mouse Button and Space
Wiimote.B = BTN_LEFT
Nunchuk.Z = BTN_RIGHT
Wiimote.A = KEY_SPACE
Wiimote.Home = KEY_E
Wiimote.2 = KEY_ESC
Sonntag, 29. Mai 2011
A fast and easy way to install the Minecraft server in Ubuntu Linux
All you've got to do in order to install the minecraft server is follow these instructions.
Or you can use a shell script i wrote:
I know the code is pretty messy, but it's the first shell script i've written so I'm OK with it ;)
Or you can use a shell script i wrote:
- download
- make it executable (
chmod a+x minecraft_server_setup.sh) - execute it(
./minecraft_server_setup.sh)
#!/bin/bash
echo -n 'Do you want to (i)nstall or (s)tart the minecraft server?'
read watdo
startit(){
 if [ -d ~/.minecraft\ server/ ]; then
  cd ~/.minecraft\ server/
  echo -n "Do you have more than 1024MB of RAM?
  (y)es or (n)o"
  read watram
  echo -n "Do you want to start the server with a GUI?
   (y)es or (n)o"
  read watgui
  case "$watram" in
   y|Y|Yes)
    case "$watgui" in
     y|Y|Yes)
      java -jar minecraft_server.jar
     ;;
     n|N|no|No)
      java -jar minecraft_server.jar nogui
     ;;
     *) echo "Unknown Parameter"
     read ''
     ;;
    esac
   ;;
   n|N|no|No)
    case "$watgui" in
     y|Y|Yes)
      java -Xmx1024M -Xms1024M -jar minecraft_server.jar
     ;;
     n|N|no|No)
      java -Xmx1024M -Xms1024M -jar minecraft_server.jar nogui
     ;;
     *) echo "Unknown Parameter"
     read ''
     ;;
    esac
   ;;
   *) echo "Unknown Parameter"
   read ''
   ;;
  esac
 else
  echo "You don't seem to have the Minecraft server installed.
Do you want to install it now?
(y)es or (n)o"
  read watdo
  installit
 fi

}
installit(){
 case "$watdo" in
 y|Y|yes|Yes|i|I|install|Install)
 if [ ! -d ~/.minecraft\ server/ ]; then
  mkdir ~/.minecraft\ server
  cd ~/.minecraft\ server/
  wget http://www.minecraft.net/download/minecraft_server.jar
  chmod a+x minecraft_server.jar
  echo -n "Do you want to start the server now?
   (y)es or (n)o"
  read startnow
  case "$startnow" in
  y|Y|Yes)
   startit
  ;;
  *)
  ;;
  esac
 else
  echo "The Minecraft Server seems to be installed.
Do you want to start it now?
(y)es or (n)o"
  read watnowdo
  case "$watnowdo" in
  y|Y|yes|Yes)
   startit
  ;;
  *)
  ;;
  esac
 fi
 ;;
 s|S|start|Start)
  startit
 ;;
 n|N|no|No)
  exit 0
 ;;
 *)
  echo "Unknown Parameter"
  read ''
 ;;
esac
}
installit
exit 0
I know the code is pretty messy, but it's the first shell script i've written so I'm OK with it ;)
Minecraft Server unter Ubuntu Linux installieren
Um Minecraft auf Ubuntu zu installieren muss man nur diesen Anweisungen folgen.
Noch einfacher gehts mit einem Script, dass ich geschrieben habe.
Der Code ist deshalb so chaotisch, weil es mein erstes Shell-Script ist ;)
Noch einfacher gehts mit einem Script, dass ich geschrieben habe.
- Downloaden
- Ausführbar machen (
chmod a+x minecraft_server_setup.sh) - Ausführen (
./minecraft_server_setup.sh)
#!/bin/bash
echo -n 'Do you want to (i)nstall or (s)tart the minecraft server?'
read watdo
startit(){
 if [ -d ~/.minecraft\ server/ ]; then
  cd ~/.minecraft\ server/
  echo -n "Do you have more than 1024MB of RAM?
  (y)es or (n)o"
  read watram
  echo -n "Do you want to start the server with a GUI?
   (y)es or (n)o"
  read watgui
  case "$watram" in
   y|Y|Yes)
    case "$watgui" in
     y|Y|Yes)
      java -jar minecraft_server.jar
     ;;
     n|N|no|No)
      java -jar minecraft_server.jar nogui
     ;;
     *) echo "Unknown Parameter"
     read ''
     ;;
    esac
   ;;
   n|N|no|No)
    case "$watgui" in
     y|Y|Yes)
      java -Xmx1024M -Xms1024M -jar minecraft_server.jar
     ;;
     n|N|no|No)
      java -Xmx1024M -Xms1024M -jar minecraft_server.jar nogui
     ;;
     *) echo "Unknown Parameter"
     read ''
     ;;
    esac
   ;;
   *) echo "Unknown Parameter"
   read ''
   ;;
  esac
 else
  echo "You don't seem to have the Minecraft server installed.
Do you want to install it now?
(y)es or (n)o"
  read watdo
  installit
 fi

}
installit(){
 case "$watdo" in
 y|Y|yes|Yes|i|I|install|Install)
 if [ ! -d ~/.minecraft\ server/ ]; then
  mkdir ~/.minecraft\ server
  cd ~/.minecraft\ server/
  wget http://www.minecraft.net/download/minecraft_server.jar
  chmod a+x minecraft_server.jar
  echo -n "Do you want to start the server now?
   (y)es or (n)o"
  read startnow
  case "$startnow" in
  y|Y|Yes)
   startit
  ;;
  *)
  ;;
  esac
 else
  echo "The Minecraft Server seems to be installed.
Do you want to start it now?
(y)es or (n)o"
  read watnowdo
  case "$watnowdo" in
  y|Y|yes|Yes)
   startit
  ;;
  *)
  ;;
  esac
 fi
 ;;
 s|S|start|Start)
  startit
 ;;
 n|N|no|No)
  exit 0
 ;;
 *)
  echo "Unknown Parameter"
  read ''
 ;;
esac
}
installit
exit 0
Der Code ist deshalb so chaotisch, weil es mein erstes Shell-Script ist ;)
Donnerstag, 26. Mai 2011
How to turn off the log in sound in Ubuntu
If you are like me, and often switch between different OS, you will get annoyed by login sounds easily. I tried to turn the Ubuntu login sound off, but the option to do so is somewhat hidden.
The Ubuntu login sound.
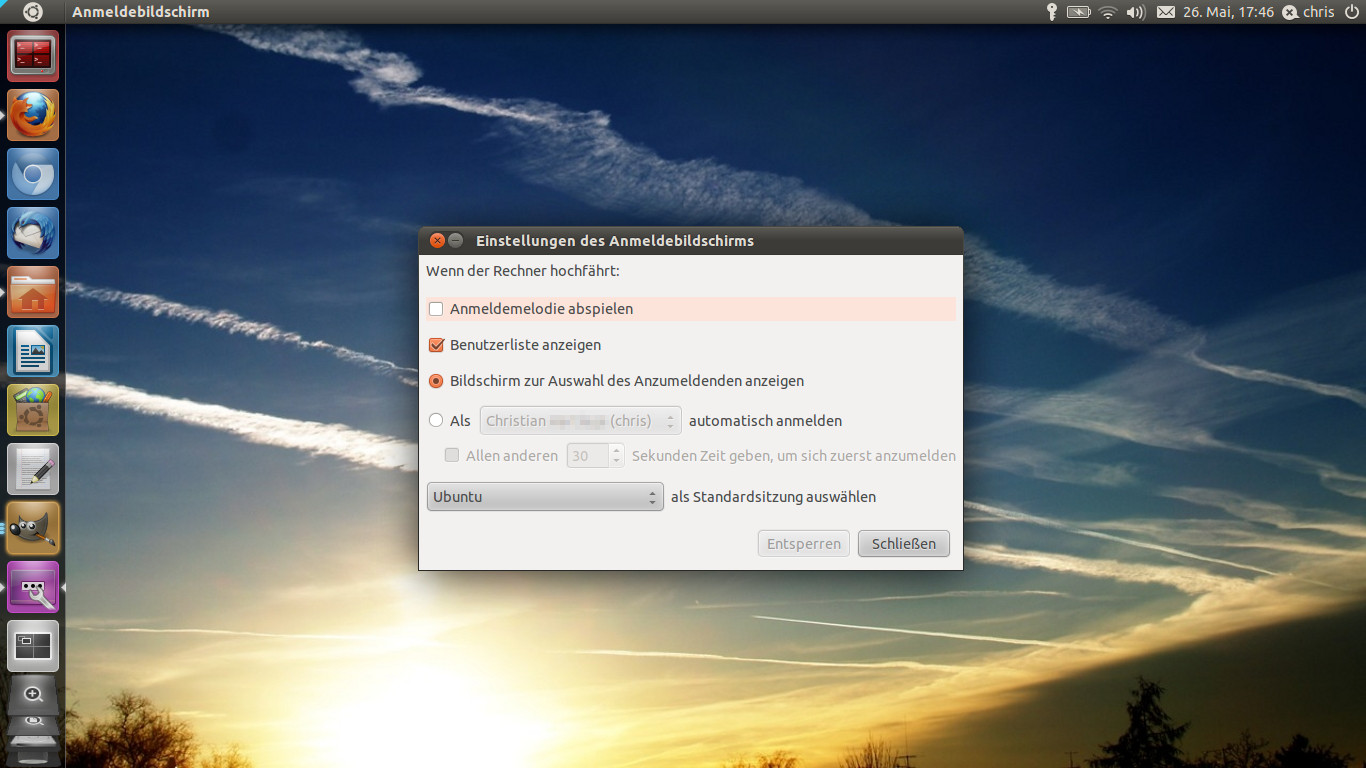
The settings in gdmsetup, didnt change anything
In order to turn off the login sounds you have to start gnome-session-properties:
In the gnome-session-properties search for "GNOME Login Sound" and remove the check mark
When you log in the next time, no login sound will be played :)
Here you can compare the Windows 7 login sound to the Ubuntu one
What do you think, which one sounds better?
And if you have a custom login sound for Windows or Ubuntu, leave a comment and let us know!
The Ubuntu login sound.
The settings in gdmsetup, didnt change anything
 |
 |
|
| gdmsetup in german Unity | options for gdmsetup in german |
 |
 |
| gnome-session-properties in Unity | Remove this check mark |
In the gnome-session-properties search for "GNOME Login Sound" and remove the check mark
When you log in the next time, no login sound will be played :)
Here you can compare the Windows 7 login sound to the Ubuntu one
What do you think, which one sounds better?
And if you have a custom login sound for Windows or Ubuntu, leave a comment and let us know!
Anmeldemelodie bzw. Loginsound deaktivieren.
Da mich die Anmeldemelodie von Ubuntu ziemlich nervt, vor allem wenn der Sound aus versehen auf voller Lautstärke ist, habe ich versucht den Loginsound auszustellen.
Der Ubuntu Login Sound.
Die Einstellung im gdmsetup ( in Unity Anmeldebildschirm genannt ) bringt jedoch keine Veränderung.
Abhilfe schafft das Bearbeiten der Startprogramme (gnome-session-properties):
Dort nach "GNOME Login Sound" suchen und den Haken entfernen.
schon kann man Ubuntu starten ohne von der Startmelodie begrüßt zu werden.
PS Trotz aller Nervigkeit gefällt mir der Login Sound von Ubuntu beser als der von Windows ;)
Der Ubuntu Login Sound.
Die Einstellung im gdmsetup ( in Unity Anmeldebildschirm genannt ) bringt jedoch keine Veränderung.
|
|
| gdmsetup in Unity | Optionen von gdmsetup |
|
|
| gnome-session-properties in Unity | Das Häkchen entfernen |
Dort nach "GNOME Login Sound" suchen und den Haken entfernen.
schon kann man Ubuntu starten ohne von der Startmelodie begrüßt zu werden.
PS Trotz aller Nervigkeit gefällt mir der Login Sound von Ubuntu beser als der von Windows ;)
Abonnieren
Posts (Atom)
