Posts mit dem Label Ubuntu werden angezeigt. Alle Posts anzeigen

Samstag, 25. Juni 2011

Datensicherung / Festplattenbackup mit Ubuntu

Der Laptop, auf dem ich die meisten Artikel hier verfasst habe, hat nach einer Bierdusche das Zeitliche gesegnet. Da die Festplatte aber noch lief und ich die ganzen Daten vor der Reparatur sichern wollte habe ich mich ein bisschen über Datensicherung mit Ubuntu schlau gemacht.

s-ATA-USB-Kabel mit Stromversorgung und IDE-Anschluss
In dem Laptop war eine 320 GB Festplatte verbaut und glücklicherweise habe ich auch eine 320 GB USB-Festplatte von CnMemory. Am einfachsten habe ich mir eine komplette 1:1 Spiegelung der Laptop-Festplatte vorgestellt. Dazu brauchte ich ein s-ATA zu USB Kabel wie z.B. dieses hier.
Ubuntu  hat die s-ATA-Festplatte des Laptops dann sofort als /dev/sdc erkannt. Die USB-Festplatte auf die ich die Daten sichern möchte ist /dev/sdd.

Nach ein wenig googeln und nachlesen in den manpages habe ich mir dann diesen Befehl zusammengesetzt:
pv /dev/sdc | dd bs=128k of=/dev/sdd
Wo /dev/sdc die Quell- und /dev/sdd die Zielfestplatte ist!

dd ist der eigentliche Befehl zum bit-genauen Kopieren der Festplatte ist, durch den Befehl pv wird die Ausgabe von dd mit einem Fortschrittsbalken versehen.


Nach ein paar Stunden war die gesamte Laptop-Festplatte auf meine USB-Festplatte gespiegelt, inklusive der verschiedenen Partitionen und Betriebssysteme!

Mittwoch, 22. Juni 2011

Ubuntu in Big Bang Theory

Saw this episode just a few minutes ago :D

Ubuntu in Big Bang Theory

Lief vor ein paar Minuten auf ProSieben :D

Donnerstag, 26. Mai 2011

How to turn off the log in sound in Ubuntu

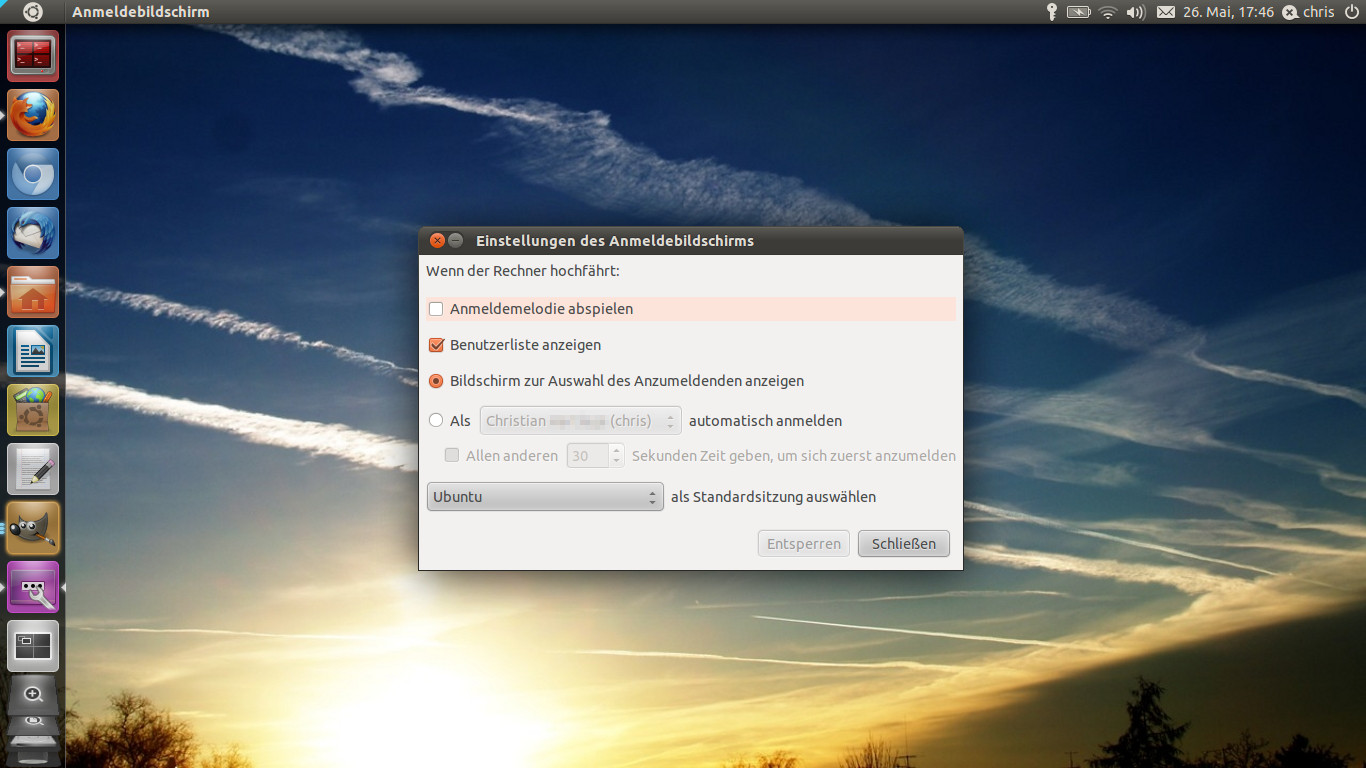
If you are like me, and often switch between different OS, you will get annoyed by login sounds easily. I tried to turn the Ubuntu login sound off, but the option to do so is somewhat hidden.


The Ubuntu login sound.


The settings in gdmsetup, didnt change anything

gdmsetup in german Unity options for gdmsetup in german
In order to turn off the login sounds you have to start gnome-session-properties:
gnome-session-properties in Unity Remove this check mark

In the gnome-session-properties search for "GNOME Login Sound" and remove the check mark
When you log in the next time, no login sound will be played :)


Here you can compare the Windows 7 login sound to the Ubuntu one
What do you think, which one sounds better?
And if you have a custom login sound for Windows or Ubuntu, leave a comment and let us know!

Anmeldemelodie bzw. Loginsound deaktivieren.

Da mich die Anmeldemelodie von Ubuntu ziemlich nervt, vor allem wenn der Sound aus versehen auf voller Lautstärke ist, habe ich versucht den Loginsound auszustellen.


Der Ubuntu Login Sound.


Die Einstellung im gdmsetup ( in Unity Anmeldebildschirm genannt ) bringt jedoch keine Veränderung.

gdmsetup in Unity Optionen von gdmsetup
Abhilfe schafft das Bearbeiten der Startprogramme (gnome-session-properties):
gnome-session-properties in Unity Das Häkchen entfernen

Dort nach "GNOME Login Sound" suchen und den Haken entfernen.
schon kann man Ubuntu starten ohne von der Startmelodie begrüßt zu werden.


PS Trotz aller Nervigkeit gefällt mir der Login Sound von Ubuntu beser als der von Windows ;)

Donnerstag, 19. Mai 2011

4 different wallpapers in Ubuntu 11.04 with Compiz

You want to have a different wallpaper on each workspace? Take a look at my screencast


The commands i used:

sagi compizconfig-settings-manager // installs the compiz settings manager

ccsm // starts the settings manager
gconf-editor // starts the gnome configuration tool
In the compizconfig-settings-manager search the wallpaper plugin, add the 4 wallpapers you want and then activate it.

Then start the gconf-editor and remove the check mark at apps>nautilus>preferences>show_desktop .

Your 4 workspace should now have different wallpapers.
If Unity displays the menubar or the dock incorrectly just log out and then log in again.

4 verschiedene Wallpaper in Ubuntu 11.04 mit Compiz

Die willst für jede der 4 Arbeitsflächen in Ubuntu 11.04 ein eigenes Hintergrundbild?
Wie das geht zeige ich hier in einem Screencast:


Die Befehle, die ich benutze:

sagi compizconfig-settings-manager // Installiert den Einstellungs-Manager von Compiz

ccsm // Startet  den Einstellungs-Manager

gconf-editor // Started das Gnome Konfigurations-Programm
Im Einstellungs-Manager von Compiz sucht man das Wallpaper-Plugin, stellt dort vier gewünschte Hintergrundbilder ein und aktiviert das Plugin dann.

Dann startet man den gconf-editor und entfernt das Häkchen unter apps>nautilus>preferences>show_desktop .

Eure 4 Workspaces sollten jetzt die verschiedenen Wallpaper anzeigen.
Wenn es, wie bei mir im Video auch, zu Darstellungsfehlern in Unity, z.B. in der Menüleiste kommt, einfach ab- und wieder anmelden.

Montag, 16. Mai 2011

how to replace the sudo apt-get install command with sagi

Installing applications with terminal commads is pretty easy and often faster than opening up the software center and searching the application in there.
sudo apt-get install $PACKETNAME
The only hard part is typing sudo apt-get install again and again ;)
If you want to replace sudo apt-get install with a shorter command like "sagi" you have got to download  this script . Now open up a terminal and move the script to your home folder and make it invisible using this command.
mv ~/downloads/pastie-1907126.sh ~/.sagi
Open the file ~/.bashrc with this command:

gedit ~/.bashrc

Add this line to the end of the file:
source ~/.sagi

Restart the terminal and you are good to go! You can now use sagi instead of sudo apt-get install, with tab-completion for package names!

Source

Sonntag, 15. Mai 2011

Sudo apt-get install mit sagi ersetzen

Wenn man Ubuntu schon etwas länger benutzt wird man feststellen, dass die Installation von Programmen per Terminal eigentlich sehr einfach und praktisch ist.
sudo apt-get install $PAKETNAME
Das einzige schwierige daran ist, jedes mal sudo apt-get install zu tippen ;)
Doch dem Abhilfe zu verschaffen ist wirklich einfach. Man lädt sich dieses Skript herunter. Dann öffnet man ein Terminal und verschiebt das Skript in den persönliche Ordner und macht es unsichtbar.
mv ~/Downloads/pastie-1907126.sh ~/.sagi
Ich gehe davon aus das sich das heruntergeladene Skript im standardmäßigen Downloadsordner befindet. Dann fügt man der Datei .bashrc aus dem persönlichen Ordner folgende Zeile ans Ende hinzu:
source ~/.sagi
Da die .bashrc-Datei unsichtbar ist muss man in der Ordneransicht unsichtbare Dateien erst per [Strg]+[H] sichtbar machen um sie zu bearbeiten. Oder man bearbeitet sie per Terminalbefehl:
gedit ~/.bashrc
Wenn man jetzt das Terminal neu startet kann man sich das Tippen von sudo apt-get install sparen und hat auch mit dem sagi Befehl noch Tab-Komplettierung für Paketnamen!

Hier ist der Originalbeitrag auf englisch:
http://ubuntuforums.org/showthread.php?t=392508

Donnerstag, 5. Mai 2011

Ubuntu Natty Narwhal install - now with Youtube and HTML5 !

When you install a new OS like Windows, you will spend a lot of time just looking at the slowly moving progress bar. But not in Ubuntu!

Watch Youtube while installing Ubuntu Natty Narwhal!
I'm installing Ubuntu 11.04 right now on my Acer ASPIRE 5742G. But even the Ubuntu installation takes some time, so I opened up Firefox and visited my Homepage.

And I was pretty surprised when I was perfectly able to watch the Family Guy Dubstep Video i uploaded a week ago. The Adobe Flash player was not even installed. Seems like Ubuntu 11.04 and the shipped Firefox 4 browser support HTML5 videos Out Of The Box.

Good job Canoncial and the Ubuntu Community! And thank you Youtube for enabling HTML5 embedded Videos!

Ubuntu Natty Narwhal Installation - Mit Youtube und HTML5 !

Wenn man ein neues Betriebssystem wie Windows installiert verbringt man viel Zeit damit, einfach auf den Fortschrittsbalken zu gucken. "Da er hat sich bewegt - Nein doch nicht :( "
Nicht aber auf Ubuntu!

Youtube-Videos während der Installation von Ubuntu angucken!
Ich verfasse diesen Artikel gerade auf meinem Acer ASPIRE 5742G - und zwar während Ubuntu 11.04 installiert! Da aber auch die Installation von Ubuntu halt ihre Zeit braucht wollte ich mal schnell meine Homepage checken und -

- wurde ziemlich überrascht als ich ohne Probleme das Family Guy Dubstep Video anschauen konnte, das ich letzte Woche hochgeladen habe. Dabei habe ich nicht einmal den Adobe Flash Player installiert! Sieht so aus als unterstütze Ubuntu mit dem mitgelieferten Firefox 4 HTML5 Videos out of the box.

Hut ab Canoncial und an die Ubuntu Community! Und Dankeschön an Youtube, dafür dass ihr eingebette Videos auch in HTML5 unterstützt!

Sonntag, 3. April 2011

Ubuntu Maverick vs. Natty vs. Mint vs. Elementary

Here you can compare the default interfaces of the different Ubuntu versions and the derivates Linux Mint and Elementary OS. Which design do you prefer?
I'll examine the differences between the different versions in an upcoming post.

Ubuntu 10.10 (Maverick Meerkat)
Ubuntu 11.04 (Natty Narwhal)
Linux Mint
Elementary OS


Freitag, 1. April 2011

How to play Minecraft on Linux Ubuntu

Minecraft is one of those games, which run on Ubuntu natively. Of course you will have to have Java set up correctly. I'll show you how to do that in a short video!
Disregard the sloppy gameplay in the video, without screencasting, everything will run smooth.


You need to install Sun Java 6
sudo apt-get install sun-java6-jdk
The most important command i used is
sudo update-java-alternatives -s java-6-sun
because even if the the sun-java6-jdk/jre is installed correctly, another jre/jdk like openjdk may be the preferred version of java, preventing Minecraft from starting.
The command will set SUNs JRE as the default one and evade problems.

Minecraft auf Linux Ubuntu installieren

Minecraft ist eines der Spiele, das man dank Java nativ auf Linux spielen kann. Das kleine Video zeigt euch wie man das richtige Java-Version installiert um Minecraft auf Linux spielen zu können.
Im Video sieht das Gameplay ein wenig ruckelig aus, ist es aber nicht. Das Spiel an sich läuft super flüssig!.


Hier noch einmal die benötigten Befehle aufgelistet und erklärt.

sudo apt-get install sun-java6-jdk → Installiert das Java Development Kit, das benötigte Programmbibliotheken mitbringt.
upgrade-java-alternatives -l → Zeigt die installierten Java Versionen an.
upgrade-java-alternatives -s java-6-sun → Legt das Java von SUN als standard fest.

Der letzte Befehl kann wichtig sein, wenn man neben sun-java6 noch das openjdk-java6 installiert hat. Minecraft läuft nach meinen Erfahrungen besser mit der Version von SUN.

Mittwoch, 30. März 2011

Gaming on Linux?

The first question I hear when talking about Ubuntu is:

Will I be able to play my games on Linux?

And the clear answer is yes and no. Yes because of the fact, that there are some games which run on Linux natively, but I have to admit that these are few.
You will be able to play Bejeweled on Linux!
(Maybe the "project bossanova" will change things)

Flash games work on Linux, as long as Flash works ;)

The interesting part about gaming on Linux is:
You will be able to play Windows games!

There is a tool called wine, which allows you to run (most) Windows applications on LInux. I'll show you how to configure it to be able to play certain games some time soon, because not being able to play your favourite game, is what keeps most Windows users sticking to Windows.

In order to demonstrate, how easy playing Windows games on Linux can be, I made a short video in which i run Warcraft III in Linux Ubuntu.


But keep in mind, that most modern games won't run on Linux just like that!

Spielen unter Linux

Das erste, was ich gefragt werde, wenn ich jemandem empfehle Ubuntu zu installieren ist meistens:

Kann ich mit Linux denn auch meine ganzen Games spielen?

Bejeweled  läuft auch mit Linux!
Die klare Antwort ist Jein. Es gibt natürlich Spiele die auch, oder sogar exklusiv für Linux entwickelt werden. Doch machen wir uns nichts vor, gute Linux-Spiele sind rar gesät.
(Vielleicht bringt das "project bossanova" ja ein bisschen Schwung in den Linux-Spiele-Sektor)


Flash-Games laufen unter Linux, sofern Flash funktioniert ;)

Jetzt aber zu dem interessanten Teil: Windows Spiele funktionieren unter Linux!

Wieso ich mich traue, das zu sagen? Weil ich noch (fast) jedes Spiel mit wine auf Ubuntu zum Laufen kriegen konnte. Und darauf möchte ich in nächster Zeit gerne etwas öfter eingehen, weil wenn ich mich so umhöre, ist die Angst davor, sein Lieblingsspiel nicht mehr spielen zu können, das häufigste Argument gegen Ubuntu.

Und um zu zeigen, wie einfach Windows Spiele manchmal auf Linux laufen, hier ein kleines Video indem ich Warcraft III mittels wine auf Ubuntu starte.

Das ist aber doch eher eine Seltenheit, dass das so einfach klappt. Die meisten modernen Spiele kriegt man nur unter Umständen zum Laufen.

Montag, 28. März 2011

Firefox 4 ganz einfach in Ubuntu installieren


If you are not from Germany, you may be interested in the english version of this tutorial.


Öffne ein Terminal deiner Wahl, kopiere den gesamten nachfolgenden Code:


sudo add-apt-repository ppa:mozillateam/firefox-stable && sudo apt-get update && sudo apt-get upgrade

füg ihn ins Terminal ein und drück Enter! Dieses kleine Code-Schnippselchen wird deinen Firefox in Ubuntu auf die aktuelle Version 4 upgraden.


Wie genau das geht, seht ihr hier

sudo = super user do: sagt Ubuntu, dass der nächste Befehl mit Administrator-Rechten ausgeführt werden soll.

add-apt-repository ppa:mozillateam/firefox-stable = Fügt das Firefox/Stable PPA des Mozillateams deiner sources.list hinzu

&& = Bedeutet das noch ein Befehl augeführt werden soll, wenn der vorhergehende erfolgreich war.

apt-get update = Lässt Ubuntu die Paketquellen abfragen und auffrischen

apt-get upgrade = Dadurch werden alle installierten Programme aktualisiert

A fast and easy way to install Firefox 4 in Ubuntu

Just open up a terminal, copy and paste the whole code

sudo add-apt-repository ppa:mozillateam/firefox-stable && sudo apt-get update && sudo apt-get upgrade

and hit Enter! That's it, your firefox will now be upgraded to version 4.


Explanation of the commands:

sudo = super user do: tells Ubuntu to run the following command with root privileges.

add-apt-repository ppa:mozillateam/firefox-stable = add the mozillateams stable firefox PPA to your sources.list

&& = Tells the Ubuntu to execute another command if the foregoing command was executed successfully

apt-get update = tells Ubuntu to update your sources.list

apt-get upgrade = tells Ubuntu to upgrade all installed applications

Sonntag, 27. März 2011

How to set up a squid proxy in Ubuntu

This works, so here is the tutorial I promised in the comments.
In order to turn your Ubuntu PC into a proxy server, you have got to install squid at first:
sudo apt-get install squid
squid will not work out of the box, so we've got to do some changes to the config file at /etc/squid/squid.conf
sudo gedit /etc/squid/squid.conf
In order to change the name of your proxy insert the line visible_hostname *yourname* at the top.

My school blocks all ports but port 80 so I have to change squids port to 80.
You can do that by locating the line containing http_port 3128 (line 1114 in Ubuntu 10.10 with squid 2.7.STABLE9) and change it to http_port 80

To allow other computers to access your squid server, you will have to find the line containing http_access allow localhost and change it to http_access allow all (line 677)

Now tell squid to apply the changes with
sudo squid -k reconfigure
Congrats, your proxy is now set up!

port forwarding with my router
If you want to access your proxy from the internet, you will have to forward port 80 from your router to port 80 on your PC. You can find a guide for your router here.

If your IP-adress is dynamic you will have to set up dyndns (or a similair service) to guarantee your proxy server is always accessible.
I'll show you how to do that in an upcoming post!

Ubuntu als Proxy Server mit squid // Internetzensur an Schulen umgehen

Kennt ihr das?
Ihr seid in der Schule/Uni/Arbeit/woauchimmeraußerhaltzuhause und wollt schnell mal die Seite XY (z.B. gulli.com) checken. Und dann taucht sie auf, die Zensurseite.

"Der Zugriff auf die Seite http://www.gulli.com mit folgender Begründung verweigert:

Extremist Content, Illegal or Unethical, Verbreitung von Weltübernahmemodellen, etc

Bei Fragen oder Beschwerden wenden Sie sich bitte an zensor@Schule/Uni/Arbeitgeber.de"

Weil das an unserer Schule wirklich sehr exzessiv praktiziert wird, wollte ich mal probieren, ob ich meinen Ubuntu-PC nicht als Proxy einrichten kann, um diese Sperre so zu umgehen.

Nach ein bisschen googlen bin ich dann auf squid und polipo gestoßen, habe mich aber für squid entschieden, weil die Wikipedia-Seite zu squid länger ist und ich das Tintenfisch-Maskottchen cool finde (no shit).

Es hat geklappt!!

Siehe Screenshot vom Remote-PC mit Windows 7 und Firefox:
Wenn das morgen wirklich die Zensurmaßnahmen der Schule aushebelt, dann poste ich mein Tutorial dazu :)
Das Setup zum Screenshot