Follow this tutorial and you will be able to play games like Minecraft with the Sixaxis Controller.
Freitag, 22. Juli 2011
Minecraft mit einem Playstation 3 Controller auf Ubuntu
Wenn diese Anleitung befolgt wurde, ist es ganz einfach QJoypad für ein Spiel, wie zum Beispiel Minecraft, zu konfigurieren. Wie das geht zeig ich euch in diesem Video:
How to set up a Sixaxis Controller with QJoypad in Ubuntu
 |
| Dualshock 3 Controller with a mini-USB-cable |
We are going to connect the Controller via USB, so you make sure your Sixaxis Controller is plugged in with a mini-USB-cable.
First of all we install the
joystick Package viasudo apt-get install joystickcat /dev/input/js0 |
| Qt's logo |
sudo apt-get install libqt4-core libqt4-dev qt4-dev-tools qt4-designer qt4-docsudo apt-get install libxtst6 libxtst-devNow comes the more complicated part: Download QJoyPad. Open up a Terminal an execute the following commands in order to extract the source.
cd ~/Downloads
tar xzf qjoypad-4.1.0.tar.gzcd cd qjoypad-4.1.0/src/
./config
make
sudo make installQJoyPad will start minimized in the system tray, but Natty doesn't allow every application to show up in the system tray. We will change these settings; execute:
gsettings set com.canonical.Unity.Panel systray-whitelist "['all']"qjoypad. Now you can take input from the controller translate it into key strokes or mouse actions. The UI should be self explanatory ;)

Donnerstag, 21. Juli 2011
Sixaxis / Dualshock 3 Controller mit Ubuntu und QJoyPad benutzen
Nachdem ich hier und hier erklärt habe, wie man seinen Wiimote mit Ubuntu verbinden und benutzen kann, möchte ich in diesem Beitrag erklären, wie man seinen Dualshock 3 bzw. Sixaxis Controller von der Playstation 3 auch am Ubuntu-PC benutzen kann.
Nachdem man den PS3-Controller per Mini-USB-Kabel mit dem PC verbunden hat und das Paket
Das Programm QJoyPad, das nachher die Controllereingaben zu Maus-, bzw Keyboardeingaben umwandelt basiert auf der Qt-Bibliothek. Falls noch nicht geschehen, installiert man Qt mit:
Jetzt kann man QJoyPad herunterladen. Nach dem Download wechselt man im Terminal ins Download-Verzeichnis und entpackt den Quellcode:
Da QJoyPad im Tray minimiert startet muss man den Unity-System-Tray so einstellen, dass er alle Tray-Icons erlaubt. Das geschieht mittels:

|
| Dualshock 3 Controller mit Mini-USB-Kabel |
Nachdem man den PS3-Controller per Mini-USB-Kabel mit dem PC verbunden hat und das Paket
joystick installiert hat:sudo apt-get install joystickcat /dev/input/js0 |
| Das Logo von Qt |
sudo apt-get install libqt4-core libqt4-dev qt4-dev-tools qt4-designer qt4-docsudo apt-get install libxtst6 libxtst-devJetzt kann man QJoyPad herunterladen. Nach dem Download wechselt man im Terminal ins Download-Verzeichnis und entpackt den Quellcode:
cd ~/Downloads
tar xzf qjoypad-4.1.0.tar.gzcd cd qjoypad-4.1.0/src/
./config
make
sudo make installDa QJoyPad im Tray minimiert startet muss man den Unity-System-Tray so einstellen, dass er alle Tray-Icons erlaubt. Das geschieht mittels:
gsettings set com.canonical.Unity.Panel systray-whitelist "['all']"qjoypad ausführen. Und die Tasten des Controllers mit Tastatur oder Mauseingaben verknüpfen.
Samstag, 25. Juni 2011
Hard Disk backup / mirroring with Ubuntu and dd
In this post I will show you how to mirror your hard disk with Ubuntu and the dd command. I used this method to backup the data from my laptop, which didn't start anymore. I was sure the hard disk was still alive and i wanted to save all my data.
At first you've got to make sure both hard disks are connected to the PC.
In my case /dev/sdc is the source and /dev/sdd is the target hard disk.
Use this command to mirror the whole hard disk, bit per bit.
The dd command copies the hard disk bit per bit and the pv command adds a neat progress bar, because by default dd comes with no visual feedback.

For me it took like 3 hours to mirror all the data to my new USB-hard-disk.
 |
| You will need a s-ATA to USB cable like this one |
In my case /dev/sdc is the source and /dev/sdd is the target hard disk.
Use this command to mirror the whole hard disk, bit per bit.
pv /dev/sdc | dd bs=128k of=/dev/sddThe dd command copies the hard disk bit per bit and the pv command adds a neat progress bar, because by default dd comes with no visual feedback.
For me it took like 3 hours to mirror all the data to my new USB-hard-disk.
Datensicherung / Festplattenbackup mit Ubuntu
Der Laptop, auf dem ich die meisten Artikel hier verfasst habe, hat nach einer Bierdusche das Zeitliche gesegnet. Da die Festplatte aber noch lief und ich die ganzen Daten vor der Reparatur sichern wollte habe ich mich ein bisschen über Datensicherung mit Ubuntu schlau gemacht.
In dem Laptop war eine 320 GB Festplatte verbaut und glücklicherweise habe ich auch eine 320 GB USB-Festplatte von CnMemory. Am einfachsten habe ich mir eine komplette 1:1 Spiegelung der Laptop-Festplatte vorgestellt. Dazu brauchte ich ein s-ATA zu USB Kabel wie z.B. dieses hier.
Ubuntu hat die s-ATA-Festplatte des Laptops dann sofort als
Nach ein wenig googeln und nachlesen in den manpages habe ich mir dann diesen Befehl zusammengesetzt:
dd ist der eigentliche Befehl zum bit-genauen Kopieren der Festplatte ist, durch den Befehl pv wird die Ausgabe von dd mit einem Fortschrittsbalken versehen.
Nach ein paar Stunden war die gesamte Laptop-Festplatte auf meine USB-Festplatte gespiegelt, inklusive der verschiedenen Partitionen und Betriebssysteme!
|
| s-ATA-USB-Kabel mit Stromversorgung und IDE-Anschluss |
Ubuntu hat die s-ATA-Festplatte des Laptops dann sofort als
/dev/sdc erkannt.
Die USB-Festplatte auf die ich die Daten sichern möchte ist /dev/sdd.Nach ein wenig googeln und nachlesen in den manpages habe ich mir dann diesen Befehl zusammengesetzt:
pv /dev/sdc | dd bs=128k of=/dev/sdddd ist der eigentliche Befehl zum bit-genauen Kopieren der Festplatte ist, durch den Befehl pv wird die Ausgabe von dd mit einem Fortschrittsbalken versehen.
Nach ein paar Stunden war die gesamte Laptop-Festplatte auf meine USB-Festplatte gespiegelt, inklusive der verschiedenen Partitionen und Betriebssysteme!
Mittwoch, 22. Juni 2011
Dienstag, 31. Mai 2011
How to play Minecraft with a Wiimote
How to set up Bluetooth correctly
Edit the file /etc/cwiid/wminput/minecraft eg. with
sudo gedit /etc/cwiid/wminput/minecraft and copy and paste the code below. You could also save this file as /etc/cwiid/wminput/minecraft Now start wminput:
sudo wminput -c minecraft -w Pointing does not work but I'm figuring it out ;)
I think the key assignment is self-explanatory.
#Head Movement
Plugin.acc.X = REL_X
Plugin.acc.Y = REL_Y
#Body Movement
Plugin.nunchuk_stick2btn.Up = KEY_W
Plugin.nunchuk_stick2btn.Down = KEY_S
Plugin.nunchuk_stick2btn.Left = KEY_A
Plugin.nunchuk_stick2btn.Right = KEY_D
#Left Mouse Button, Right Mouse Button and Space
Wiimote.B = BTN_LEFT
Nunchuk.Z = BTN_RIGHT
Wiimote.A = KEY_SPACE
Wiimote.Home = KEY_E
Wiimote.2 = KEY_ESC
[Tutorial] Minecraft mit Wiimote und Nunchuk spielen
Falls Bluetooth noch nicht läuft
Hier habe ich eine Anleitung geschrieben um Bluetooth zum laufen zu bekommen.
sudo apt-get install bluez-utils libopenobex1 wmgui wminputsudo /etc/init.d/bluetooth restartsudo modprobe uinputsudo su echo "uinput" >> /etc/modules
Bearbeite die Datei /etc/cwiid/wminput/minecraft z.B. mit
sudo gedit /etc/cwiid/wminput/minecraft und füge den Code von unten ein. Du kannst auch diese Datei als /etc/cwiid/wminput/minecraft speichern.Dann wminput per
sudo wminput -c minecraft -w starten.Die Maus wird dann durch Kippen des Wiimote gesteuern, WASD liegt auf dem Stick den Nunchuk. Die B-Taste ist die Linke Mausstaste, Z (Nunchuk) die Rechte, mit A hüpft man (Leertaste), mit der Home-Taste öffnet man das Inventar (E) und mit Taste 2 drückt man Escape. Ich bin gerade dabei, eine Config zu machen, mit der man Minecraft mit dem Infrarotsensor, also wirklich durch zielen auf den Bildschirm und nicht nur durch kippen
#Head Movement
Plugin.acc.X = REL_X
Plugin.acc.Y = REL_Y
#Body Movement
Plugin.nunchuk_stick2btn.Up = KEY_W
Plugin.nunchuk_stick2btn.Down = KEY_S
Plugin.nunchuk_stick2btn.Left = KEY_A
Plugin.nunchuk_stick2btn.Right = KEY_D
#Left Mouse Button, Right Mouse Button and Space
Wiimote.B = BTN_LEFT
Nunchuk.Z = BTN_RIGHT
Wiimote.A = KEY_SPACE
Wiimote.Home = KEY_E
Wiimote.2 = KEY_ESC
Sonntag, 29. Mai 2011
A fast and easy way to install the Minecraft server in Ubuntu Linux
All you've got to do in order to install the minecraft server is follow these instructions.
Or you can use a shell script i wrote:
I know the code is pretty messy, but it's the first shell script i've written so I'm OK with it ;)
Or you can use a shell script i wrote:
- download
- make it executable (
chmod a+x minecraft_server_setup.sh) - execute it(
./minecraft_server_setup.sh)
#!/bin/bash
echo -n 'Do you want to (i)nstall or (s)tart the minecraft server?'
read watdo
startit(){
 if [ -d ~/.minecraft\ server/ ]; then
  cd ~/.minecraft\ server/
  echo -n "Do you have more than 1024MB of RAM?
  (y)es or (n)o"
  read watram
  echo -n "Do you want to start the server with a GUI?
   (y)es or (n)o"
  read watgui
  case "$watram" in
   y|Y|Yes)
    case "$watgui" in
     y|Y|Yes)
      java -jar minecraft_server.jar
     ;;
     n|N|no|No)
      java -jar minecraft_server.jar nogui
     ;;
     *) echo "Unknown Parameter"
     read ''
     ;;
    esac
   ;;
   n|N|no|No)
    case "$watgui" in
     y|Y|Yes)
      java -Xmx1024M -Xms1024M -jar minecraft_server.jar
     ;;
     n|N|no|No)
      java -Xmx1024M -Xms1024M -jar minecraft_server.jar nogui
     ;;
     *) echo "Unknown Parameter"
     read ''
     ;;
    esac
   ;;
   *) echo "Unknown Parameter"
   read ''
   ;;
  esac
 else
  echo "You don't seem to have the Minecraft server installed.
Do you want to install it now?
(y)es or (n)o"
  read watdo
  installit
 fi

}
installit(){
 case "$watdo" in
 y|Y|yes|Yes|i|I|install|Install)
 if [ ! -d ~/.minecraft\ server/ ]; then
  mkdir ~/.minecraft\ server
  cd ~/.minecraft\ server/
  wget http://www.minecraft.net/download/minecraft_server.jar
  chmod a+x minecraft_server.jar
  echo -n "Do you want to start the server now?
   (y)es or (n)o"
  read startnow
  case "$startnow" in
  y|Y|Yes)
   startit
  ;;
  *)
  ;;
  esac
 else
  echo "The Minecraft Server seems to be installed.
Do you want to start it now?
(y)es or (n)o"
  read watnowdo
  case "$watnowdo" in
  y|Y|yes|Yes)
   startit
  ;;
  *)
  ;;
  esac
 fi
 ;;
 s|S|start|Start)
  startit
 ;;
 n|N|no|No)
  exit 0
 ;;
 *)
  echo "Unknown Parameter"
  read ''
 ;;
esac
}
installit
exit 0
I know the code is pretty messy, but it's the first shell script i've written so I'm OK with it ;)
Minecraft Server unter Ubuntu Linux installieren
Um Minecraft auf Ubuntu zu installieren muss man nur diesen Anweisungen folgen.
Noch einfacher gehts mit einem Script, dass ich geschrieben habe.
Der Code ist deshalb so chaotisch, weil es mein erstes Shell-Script ist ;)
Noch einfacher gehts mit einem Script, dass ich geschrieben habe.
- Downloaden
- Ausführbar machen (
chmod a+x minecraft_server_setup.sh) - Ausführen (
./minecraft_server_setup.sh)
#!/bin/bash
echo -n 'Do you want to (i)nstall or (s)tart the minecraft server?'
read watdo
startit(){
 if [ -d ~/.minecraft\ server/ ]; then
  cd ~/.minecraft\ server/
  echo -n "Do you have more than 1024MB of RAM?
  (y)es or (n)o"
  read watram
  echo -n "Do you want to start the server with a GUI?
   (y)es or (n)o"
  read watgui
  case "$watram" in
   y|Y|Yes)
    case "$watgui" in
     y|Y|Yes)
      java -jar minecraft_server.jar
     ;;
     n|N|no|No)
      java -jar minecraft_server.jar nogui
     ;;
     *) echo "Unknown Parameter"
     read ''
     ;;
    esac
   ;;
   n|N|no|No)
    case "$watgui" in
     y|Y|Yes)
      java -Xmx1024M -Xms1024M -jar minecraft_server.jar
     ;;
     n|N|no|No)
      java -Xmx1024M -Xms1024M -jar minecraft_server.jar nogui
     ;;
     *) echo "Unknown Parameter"
     read ''
     ;;
    esac
   ;;
   *) echo "Unknown Parameter"
   read ''
   ;;
  esac
 else
  echo "You don't seem to have the Minecraft server installed.
Do you want to install it now?
(y)es or (n)o"
  read watdo
  installit
 fi

}
installit(){
 case "$watdo" in
 y|Y|yes|Yes|i|I|install|Install)
 if [ ! -d ~/.minecraft\ server/ ]; then
  mkdir ~/.minecraft\ server
  cd ~/.minecraft\ server/
  wget http://www.minecraft.net/download/minecraft_server.jar
  chmod a+x minecraft_server.jar
  echo -n "Do you want to start the server now?
   (y)es or (n)o"
  read startnow
  case "$startnow" in
  y|Y|Yes)
   startit
  ;;
  *)
  ;;
  esac
 else
  echo "The Minecraft Server seems to be installed.
Do you want to start it now?
(y)es or (n)o"
  read watnowdo
  case "$watnowdo" in
  y|Y|yes|Yes)
   startit
  ;;
  *)
  ;;
  esac
 fi
 ;;
 s|S|start|Start)
  startit
 ;;
 n|N|no|No)
  exit 0
 ;;
 *)
  echo "Unknown Parameter"
  read ''
 ;;
esac
}
installit
exit 0
Der Code ist deshalb so chaotisch, weil es mein erstes Shell-Script ist ;)
Donnerstag, 26. Mai 2011
How to turn off the log in sound in Ubuntu
If you are like me, and often switch between different OS, you will get annoyed by login sounds easily. I tried to turn the Ubuntu login sound off, but the option to do so is somewhat hidden.
The Ubuntu login sound.
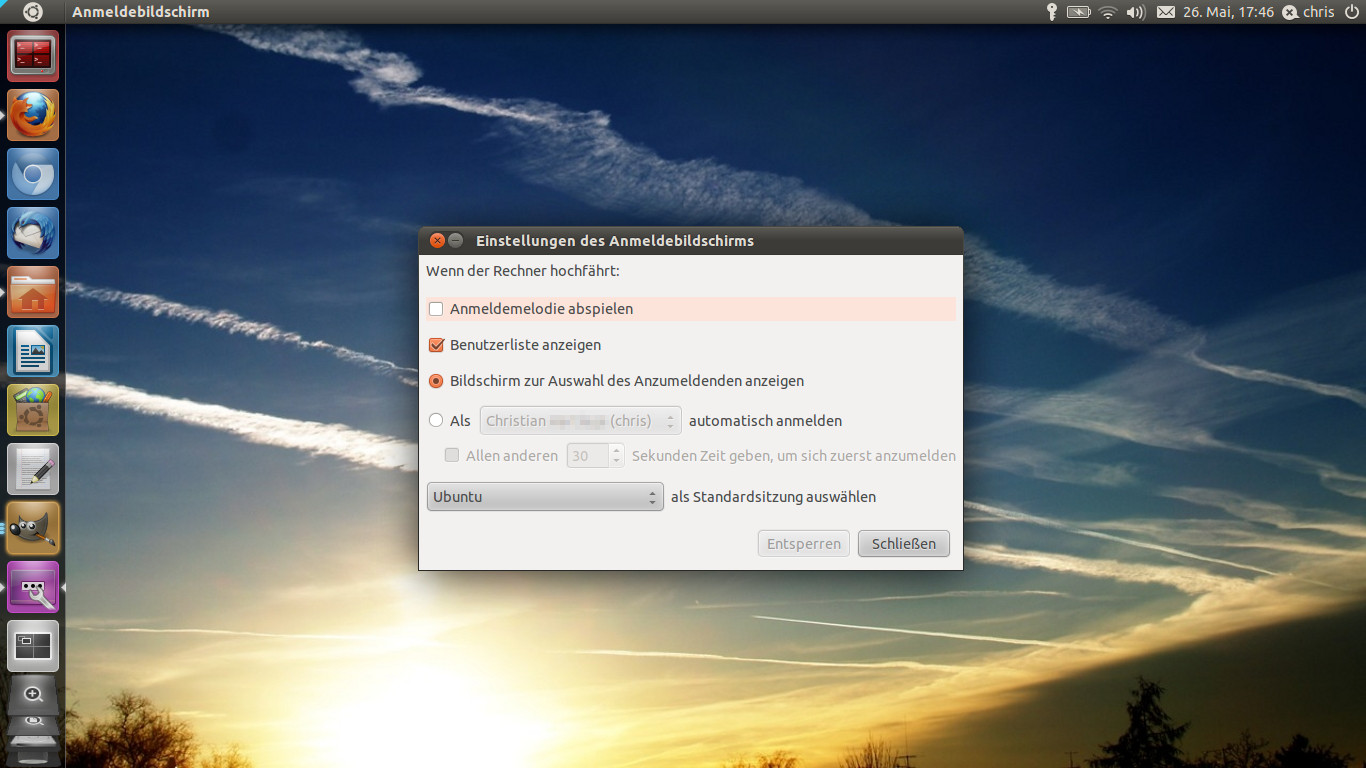
The settings in gdmsetup, didnt change anything
In order to turn off the login sounds you have to start gnome-session-properties:
In the gnome-session-properties search for "GNOME Login Sound" and remove the check mark
When you log in the next time, no login sound will be played :)
Here you can compare the Windows 7 login sound to the Ubuntu one
What do you think, which one sounds better?
And if you have a custom login sound for Windows or Ubuntu, leave a comment and let us know!
The Ubuntu login sound.
The settings in gdmsetup, didnt change anything
 |
 |
|
| gdmsetup in german Unity | options for gdmsetup in german |
 |
 |
| gnome-session-properties in Unity | Remove this check mark |
In the gnome-session-properties search for "GNOME Login Sound" and remove the check mark
When you log in the next time, no login sound will be played :)
Here you can compare the Windows 7 login sound to the Ubuntu one
What do you think, which one sounds better?
And if you have a custom login sound for Windows or Ubuntu, leave a comment and let us know!
Anmeldemelodie bzw. Loginsound deaktivieren.
Da mich die Anmeldemelodie von Ubuntu ziemlich nervt, vor allem wenn der Sound aus versehen auf voller Lautstärke ist, habe ich versucht den Loginsound auszustellen.
Der Ubuntu Login Sound.
Die Einstellung im gdmsetup ( in Unity Anmeldebildschirm genannt ) bringt jedoch keine Veränderung.
Abhilfe schafft das Bearbeiten der Startprogramme (gnome-session-properties):
Dort nach "GNOME Login Sound" suchen und den Haken entfernen.
schon kann man Ubuntu starten ohne von der Startmelodie begrüßt zu werden.
PS Trotz aller Nervigkeit gefällt mir der Login Sound von Ubuntu beser als der von Windows ;)
Der Ubuntu Login Sound.
Die Einstellung im gdmsetup ( in Unity Anmeldebildschirm genannt ) bringt jedoch keine Veränderung.
|
|
| gdmsetup in Unity | Optionen von gdmsetup |
|
|
| gnome-session-properties in Unity | Das Häkchen entfernen |
Dort nach "GNOME Login Sound" suchen und den Haken entfernen.
schon kann man Ubuntu starten ohne von der Startmelodie begrüßt zu werden.
PS Trotz aller Nervigkeit gefällt mir der Login Sound von Ubuntu beser als der von Windows ;)
Donnerstag, 19. Mai 2011
4 different wallpapers in Ubuntu 11.04 with Compiz
You want to have a different wallpaper on each workspace? Take a look at my screencast
The commands i used:
Then start the gconf-editor and remove the check mark at apps>nautilus>preferences>show_desktop .
Your 4 workspace should now have different wallpapers.
If Unity displays the menubar or the dock incorrectly just log out and then log in again.
The commands i used:
sagi compizconfig-settings-manager // installs the compiz settings manager

ccsm // starts the settings manager
gconf-editor // starts the gnome configuration tool
Then start the gconf-editor and remove the check mark at apps>nautilus>preferences>show_desktop .
Your 4 workspace should now have different wallpapers.
If Unity displays the menubar or the dock incorrectly just log out and then log in again.
4 verschiedene Wallpaper in Ubuntu 11.04 mit Compiz
Die willst für jede der 4 Arbeitsflächen in Ubuntu 11.04 ein eigenes Hintergrundbild?
Wie das geht zeige ich hier in einem Screencast:
Die Befehle, die ich benutze:
Dann startet man den gconf-editor und entfernt das Häkchen unter apps>nautilus>preferences>show_desktop .
Eure 4 Workspaces sollten jetzt die verschiedenen Wallpaper anzeigen.
Wenn es, wie bei mir im Video auch, zu Darstellungsfehlern in Unity, z.B. in der Menüleiste kommt, einfach ab- und wieder anmelden.
Wie das geht zeige ich hier in einem Screencast:
Die Befehle, die ich benutze:
sagi compizconfig-settings-manager // Installiert den Einstellungs-Manager von Compiz

ccsm // Startet  den Einstellungs-Manager

gconf-editor // Started das Gnome Konfigurations-Programm
Dann startet man den gconf-editor und entfernt das Häkchen unter apps>nautilus>preferences>show_desktop .
Eure 4 Workspaces sollten jetzt die verschiedenen Wallpaper anzeigen.
Wenn es, wie bei mir im Video auch, zu Darstellungsfehlern in Unity, z.B. in der Menüleiste kommt, einfach ab- und wieder anmelden.
Montag, 16. Mai 2011
how to replace the sudo apt-get install command with sagi
Installing applications with terminal commads is pretty easy and often faster than opening up the software center and searching the application in there.
If you want to replace sudo apt-get install with a shorter command like "sagi" you have got to download this script . Now open up a terminal and move the script to your home folder and make it invisible using this command.
 Open the file ~/.bashrc with this command:
Add this line to the end of the file:
Restart the terminal and you are good to go! You can now use sagi instead of sudo apt-get install, with tab-completion for package names!
Source
sudo apt-get install $PACKETNAMEIf you want to replace sudo apt-get install with a shorter command like "sagi" you have got to download this script . Now open up a terminal and move the script to your home folder and make it invisible using this command.
mv ~/downloads/pastie-1907126.sh ~/.sagi Open the file ~/.bashrc with this command:
gedit ~/.bashrcAdd this line to the end of the file:
source ~/.sagiRestart the terminal and you are good to go! You can now use sagi instead of sudo apt-get install, with tab-completion for package names!
Source
Sonntag, 15. Mai 2011
Sudo apt-get install mit sagi ersetzen
Wenn man Ubuntu schon etwas länger benutzt wird man feststellen, dass die Installation von Programmen per Terminal eigentlich sehr einfach und praktisch ist.
Doch dem Abhilfe zu verschaffen ist wirklich einfach. Man lädt sich dieses Skript herunter. Dann öffnet man ein Terminal und verschiebt das Skript in den persönliche Ordner und macht es unsichtbar.
Ich gehe davon aus das sich das heruntergeladene Skript im standardmäßigen Downloadsordner befindet. Dann fügt man der Datei .bashrc aus dem persönlichen Ordner folgende Zeile ans Ende hinzu:
Hier ist der Originalbeitrag auf englisch:
http://ubuntuforums.org/showthread.php?t=392508
sudo apt-get install $PAKETNAMEDoch dem Abhilfe zu verschaffen ist wirklich einfach. Man lädt sich dieses Skript herunter. Dann öffnet man ein Terminal und verschiebt das Skript in den persönliche Ordner und macht es unsichtbar.
mv ~/Downloads/pastie-1907126.sh ~/.sagisource ~/.sagigedit ~/.bashrcHier ist der Originalbeitrag auf englisch:
http://ubuntuforums.org/showthread.php?t=392508
Donnerstag, 5. Mai 2011
Ubuntu Natty Narwhal install - now with Youtube and HTML5 !
When you install a new OS like Windows, you will spend a lot of time just looking at the slowly moving progress bar. But not in Ubuntu!
I'm installing Ubuntu 11.04 right now on my Acer ASPIRE 5742G. But even the Ubuntu installation takes some time, so I opened up Firefox and visited my Homepage.
And I was pretty surprised when I was perfectly able to watch the Family Guy Dubstep Video i uploaded a week ago. The Adobe Flash player was not even installed. Seems like Ubuntu 11.04 and the shipped Firefox 4 browser support HTML5 videos Out Of The Box.
Good job Canoncial and the Ubuntu Community! And thank you Youtube for enabling HTML5 embedded Videos!
 |
| Watch Youtube while installing Ubuntu Natty Narwhal! |
And I was pretty surprised when I was perfectly able to watch the Family Guy Dubstep Video i uploaded a week ago. The Adobe Flash player was not even installed. Seems like Ubuntu 11.04 and the shipped Firefox 4 browser support HTML5 videos Out Of The Box.
Good job Canoncial and the Ubuntu Community! And thank you Youtube for enabling HTML5 embedded Videos!
Ubuntu Natty Narwhal Installation - Mit Youtube und HTML5 !
Wenn man ein neues Betriebssystem wie Windows installiert verbringt man viel Zeit damit, einfach auf den Fortschrittsbalken zu gucken. "Da er hat sich bewegt - Nein doch nicht :( "
Nicht aber auf Ubuntu!
Ich verfasse diesen Artikel gerade auf meinem Acer ASPIRE 5742G - und zwar während Ubuntu 11.04 installiert! Da aber auch die Installation von Ubuntu halt ihre Zeit braucht wollte ich mal schnell meine Homepage checken und -
- wurde ziemlich überrascht als ich ohne Probleme das Family Guy Dubstep Video anschauen konnte, das ich letzte Woche hochgeladen habe. Dabei habe ich nicht einmal den Adobe Flash Player installiert! Sieht so aus als unterstütze Ubuntu mit dem mitgelieferten Firefox 4 HTML5 Videos out of the box.
Hut ab Canoncial und an die Ubuntu Community! Und Dankeschön an Youtube, dafür dass ihr eingebette Videos auch in HTML5 unterstützt!
Nicht aber auf Ubuntu!
|
| Youtube-Videos während der Installation von Ubuntu angucken! |
- wurde ziemlich überrascht als ich ohne Probleme das Family Guy Dubstep Video anschauen konnte, das ich letzte Woche hochgeladen habe. Dabei habe ich nicht einmal den Adobe Flash Player installiert! Sieht so aus als unterstütze Ubuntu mit dem mitgelieferten Firefox 4 HTML5 Videos out of the box.
Hut ab Canoncial und an die Ubuntu Community! Und Dankeschön an Youtube, dafür dass ihr eingebette Videos auch in HTML5 unterstützt!
Abonnieren
Posts (Atom)
